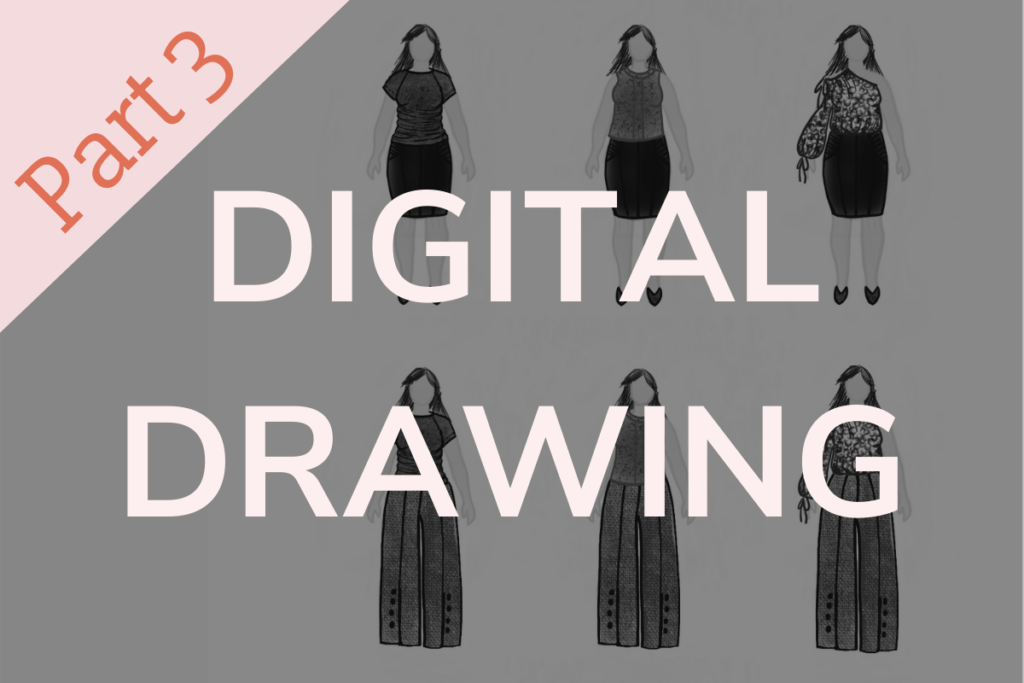
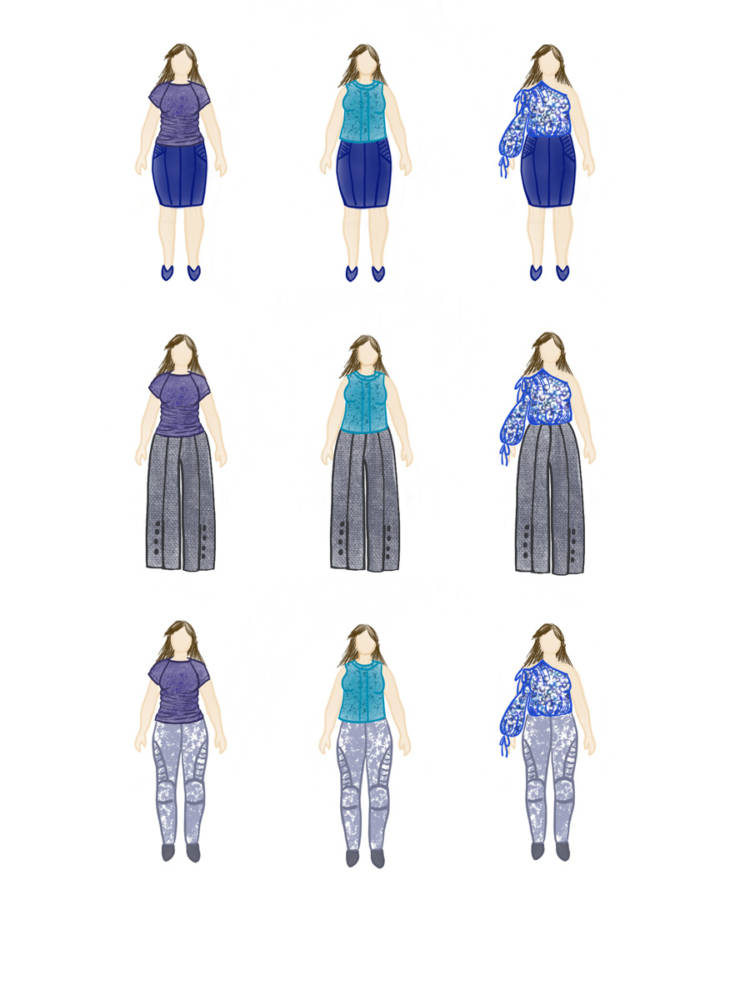
Are you ready to uplevel your fashion design app skills and play with outfit combinations on your body model croquis? Doctor T shares how to use the advanced layers feature in the Procreate app to design a 3×3 summer capsule wardrobe: 3 tops x 3 bottoms, for a total of 9 different outfits!
In this final installment of this digital sketching series, we will use everything we learned in the tutorials Part 1 and Part 2 to create a mini capsule wardrobe. I am sure many people are finding it a bit difficult to feel inspired during the stressful time of the Coronavirus pandemic, and I’m afraid I’m a bit the same. So instead of trying to creatively put together a new collection, I’ve returned to an old idea for a mini capsule wardrobe from 2018 that I never got around to sewing.
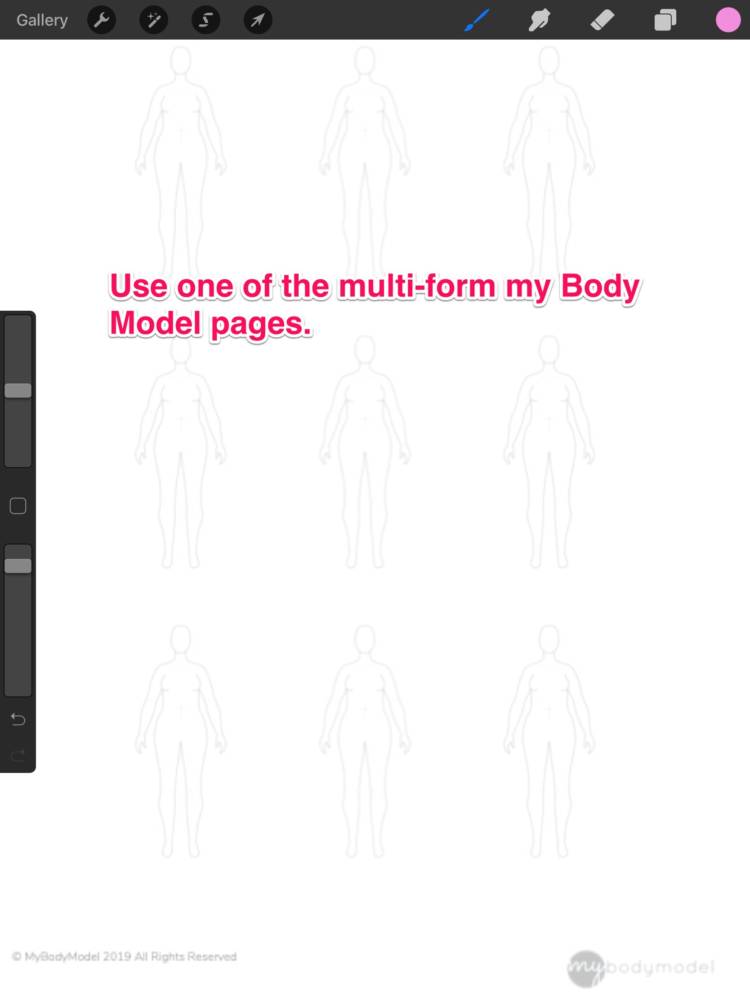
This week we will continue to explore the advanced features of the Procreate app on the iPad Pro and using the Apple Pencil, along with the 3 x 3 multi-croquis page from MyBodyModel.
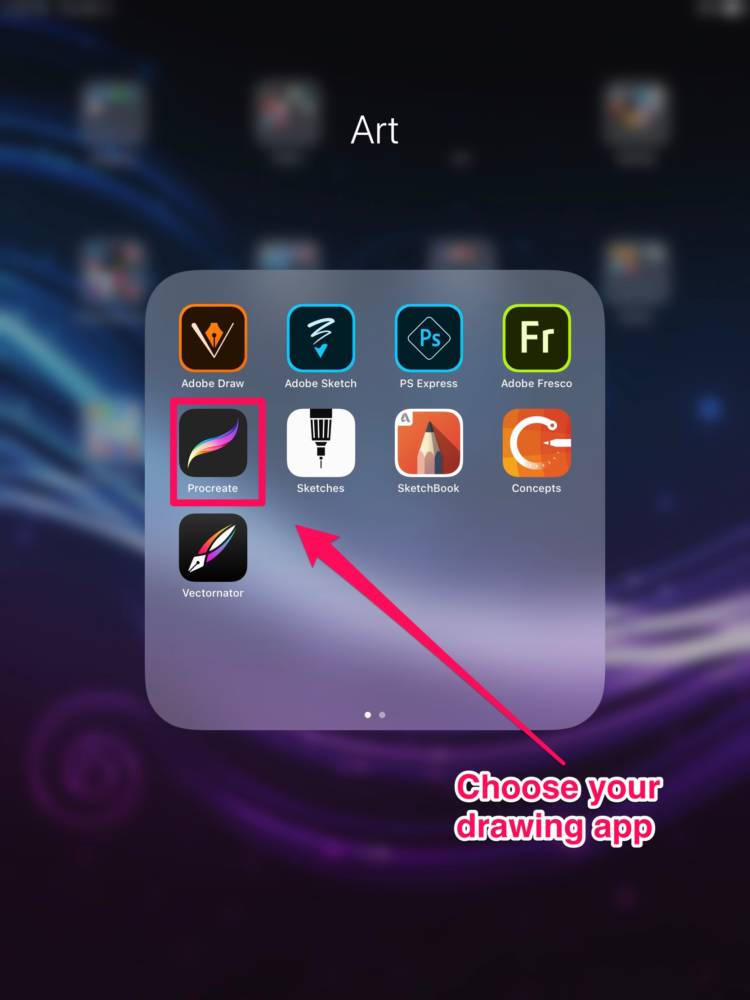
You can try these digital drawing techniques using any smartphone or tablet and touchscreen-compatible stylus, and any drawing app that offers a “layers” feature. If you’re not sure where to start, check out the 9 different free & paid apps that I reviewed in this blog post. To learn how to use layers in the free drawing app Autodesk Sketchbook, check out the “Digital Paper Dolls: Learn Digital Drawing Basics” on-demand video course at MyBodyModel’s Illustrated Style School.
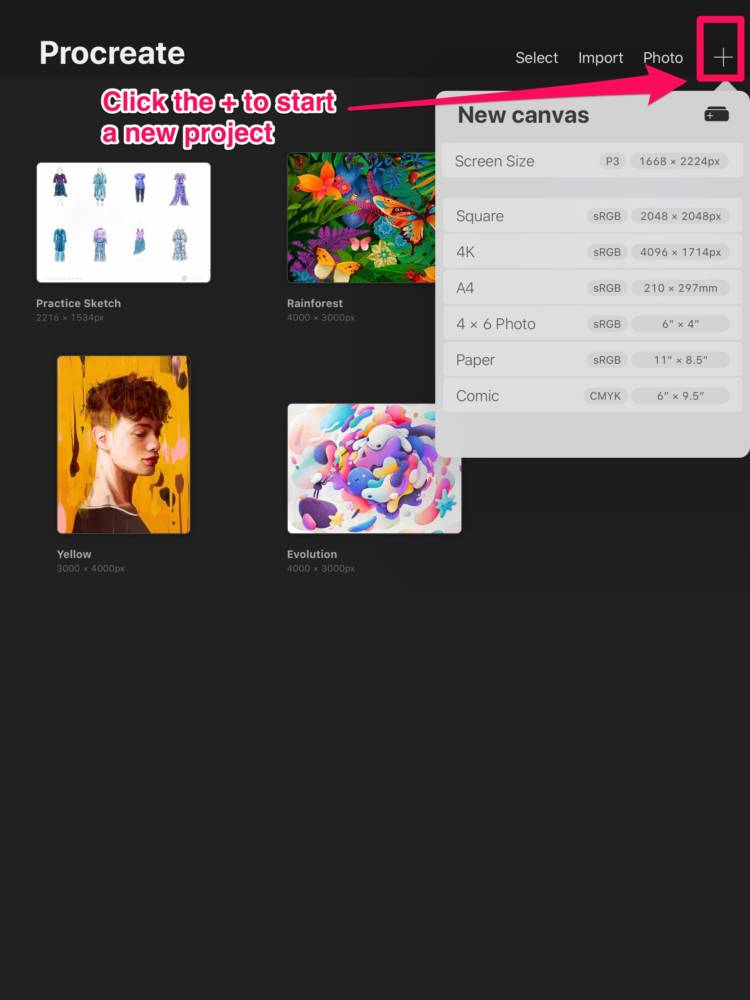
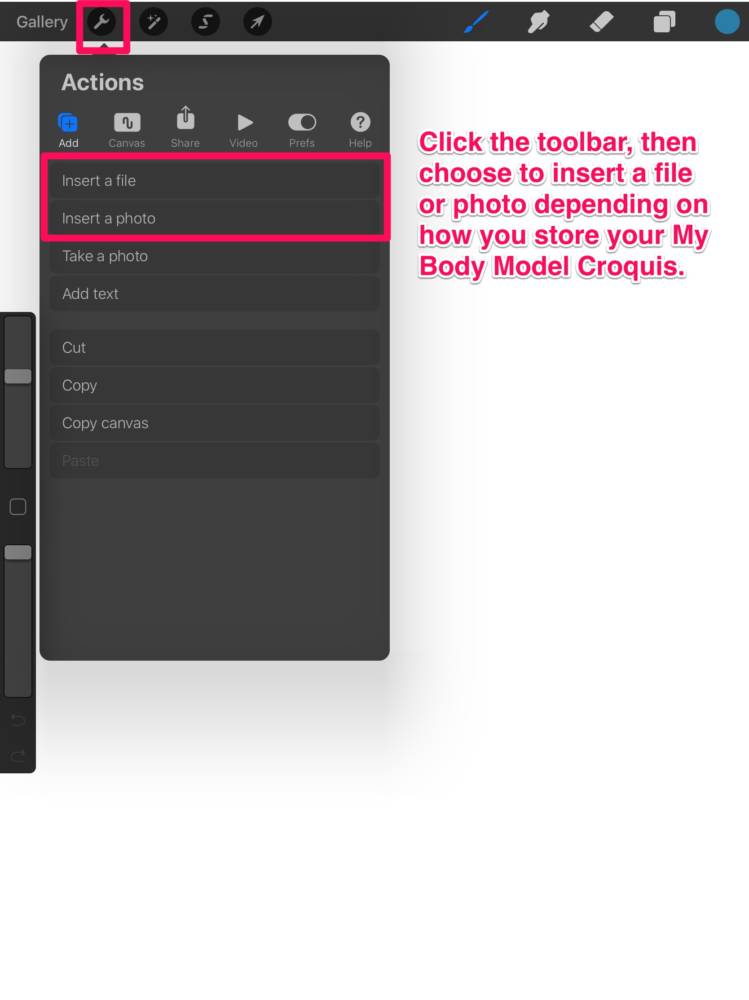
Step 1: Open your favorite drawing app and import your croquis
We will start this tutorial in the same way we have started the previous two tutorials, by opening our drawing app, starting a new project, and importing our My Body Model croquis.
Step 2: Choose your garments
Since I had an existing plan that I wanted to work from, I needed to narrow down my choices a bit for this sketch. To maximize my mix-n-match potential for the 3×3 croquis layout, I’m choosing 3 tops and 3 bottoms. I want to have a range of silhouettes, so I’m picking 1 t-shirt, 1 tank blouse, and 1 fun summer blouse; and for the bottoms 1 skirt, 1 wide legged trouser, and 1 skinny pant.
Top Patterns:
Bottom Patterns:
- BurdaStyle Magazine 04/2012 #135
- Vogue 9282B
- My Image M1253A (OOP)
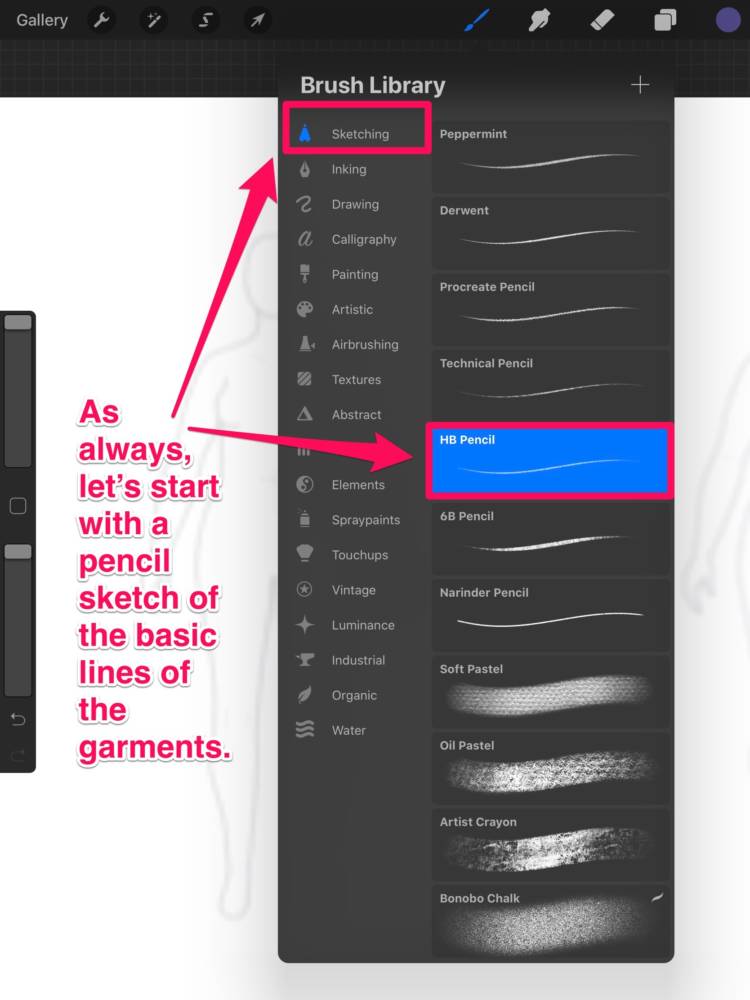
Step 3: Start sketching!
I really like to pencil sketch the basic line drawing of the garment onto the croquis.
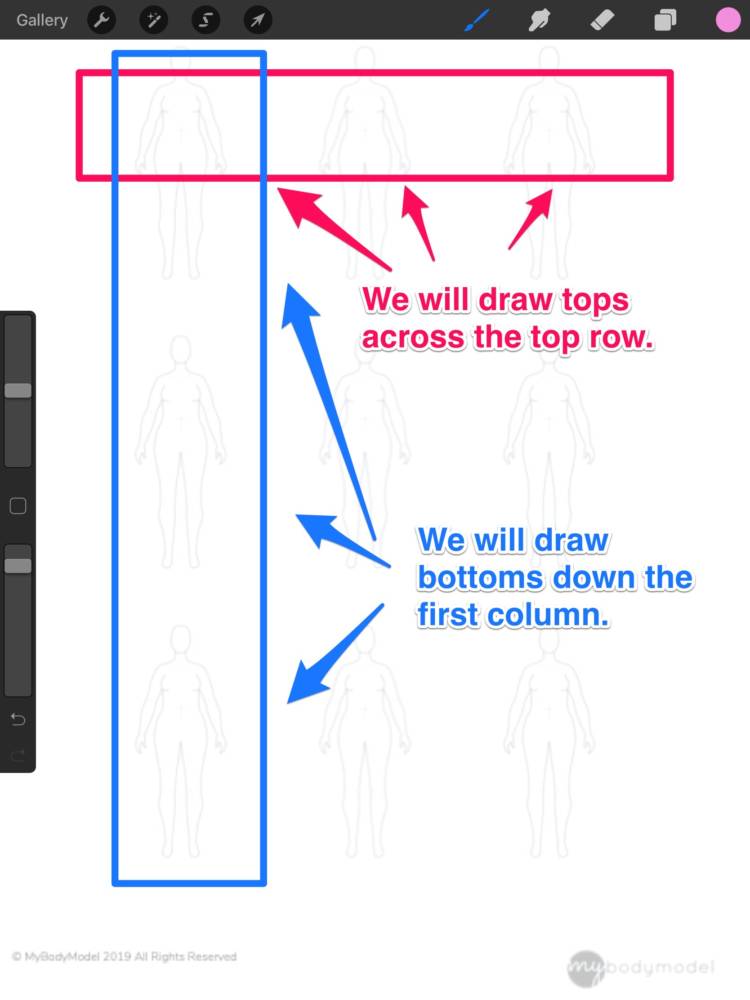
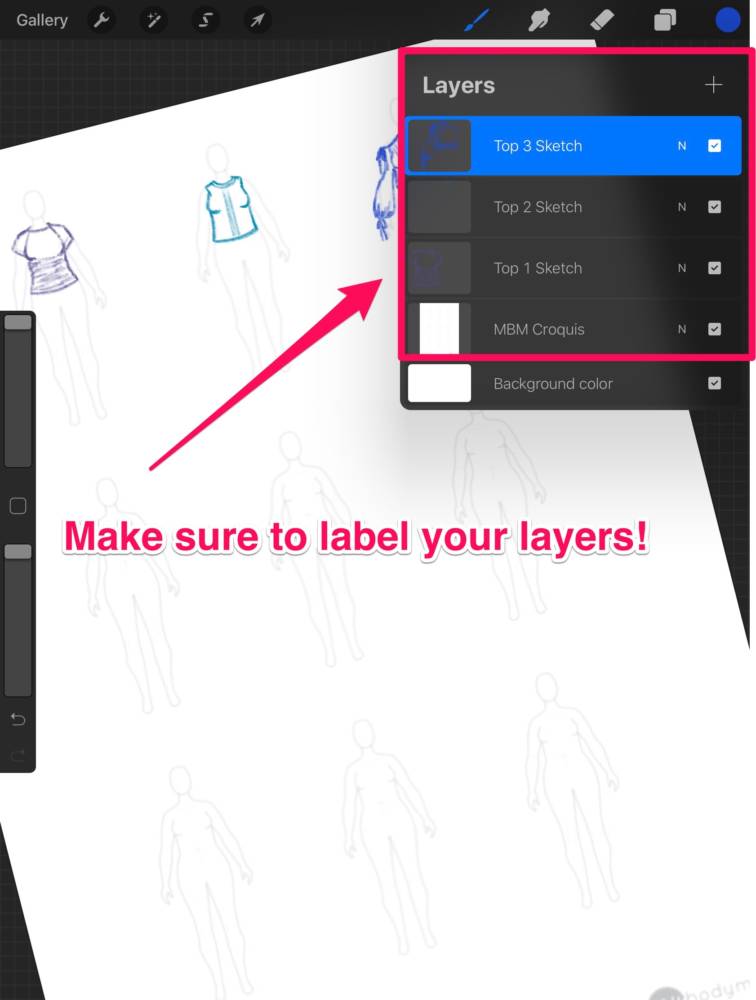
This time, since I will need to sketch out 6 different garments, I’m going to have to be strategic about their layout to help me keep track of everything.
During this step I’m going to rely on the use of layers, changing brushes, and the eraser tool to make sure everything is laid out how I want before I move on to add coloring and finishing touches to the garments.
If you aren’t sure how to select different brushes, erase, or edit layer properties I highly recommend your refer back to Part 2 of this tutorial series.
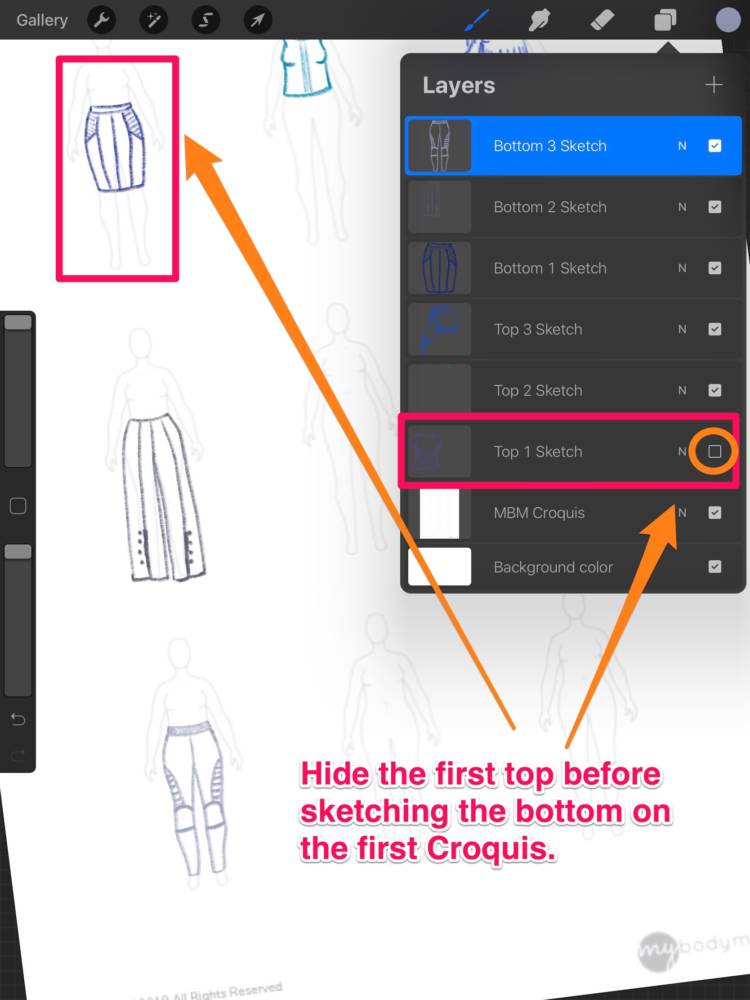
By the end of this step you should have a basic sketch for each of your garments in a separate layer and should have a basic idea of how well you like the look of the garment lines on your croquis.
If you don’t like a particular garment, or might want to test a few different options, don’t be afraid to add more layers! Basic outline sketches don’t take too long, and it is easy to turn them off or delete them if you decide it isn’t quite working out the way you intended.
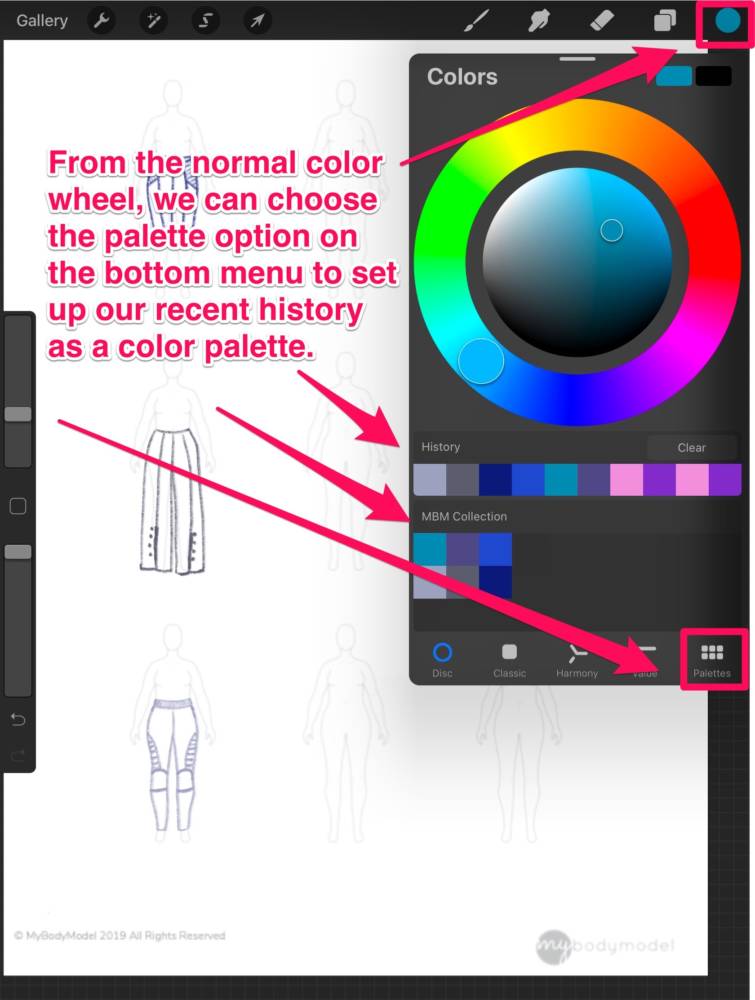
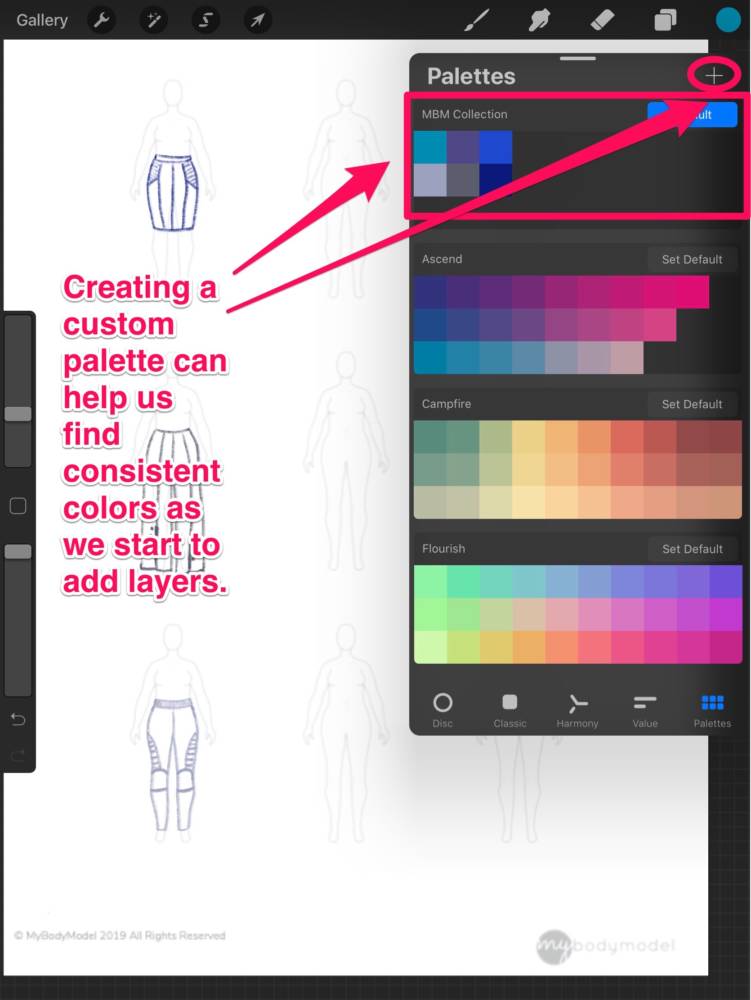
Step 4: Let’s make a custom color palette!
In last week’s tutorial, we used the Procreate color wheel to pick colors for our design as we went along. This week, however, since we are creating so many different garments it can be helpful to create a custom color palette so that you can access the colors you need more easily, especially if you want to create many layers for coloring in each garment.
Step 5: Color and ink your sketches
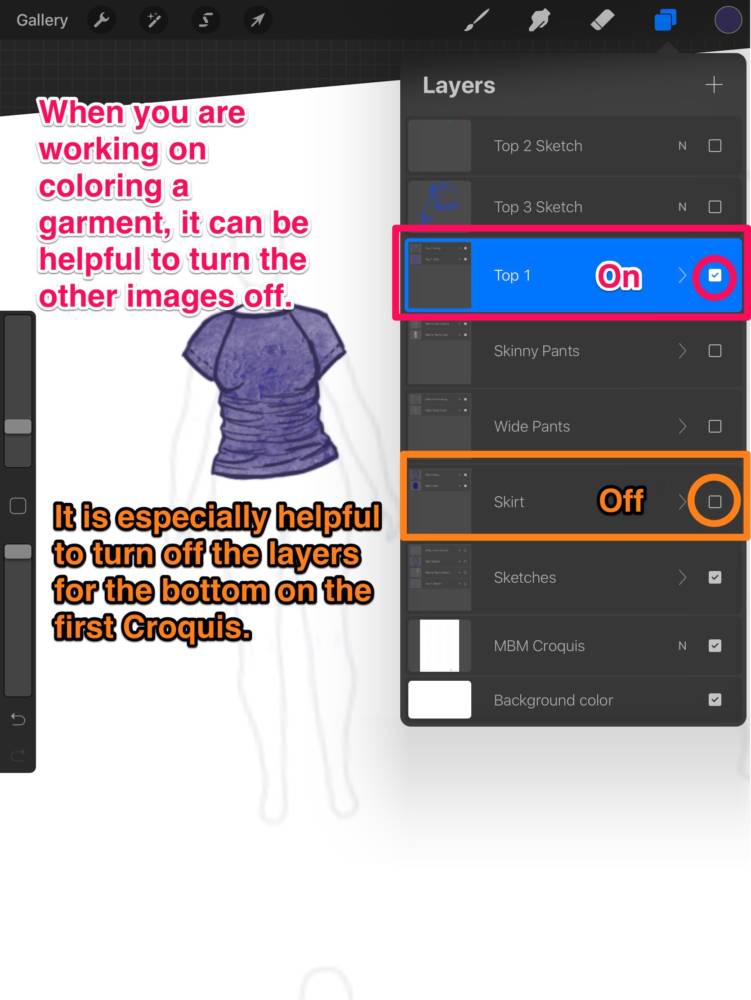
Now that I have a cohesive color palette to work from, I’m going to proceed by creating even more layers to color and ink my garments. I’m basically trying to get each garment into a “finished” state before I move on to the mix-n-match step. This is arguably the most fun step, where you get to have fun and explore your brush options! Play with different tools, brushes, and opacity settings to create colors and textures that mimic your fabrics.
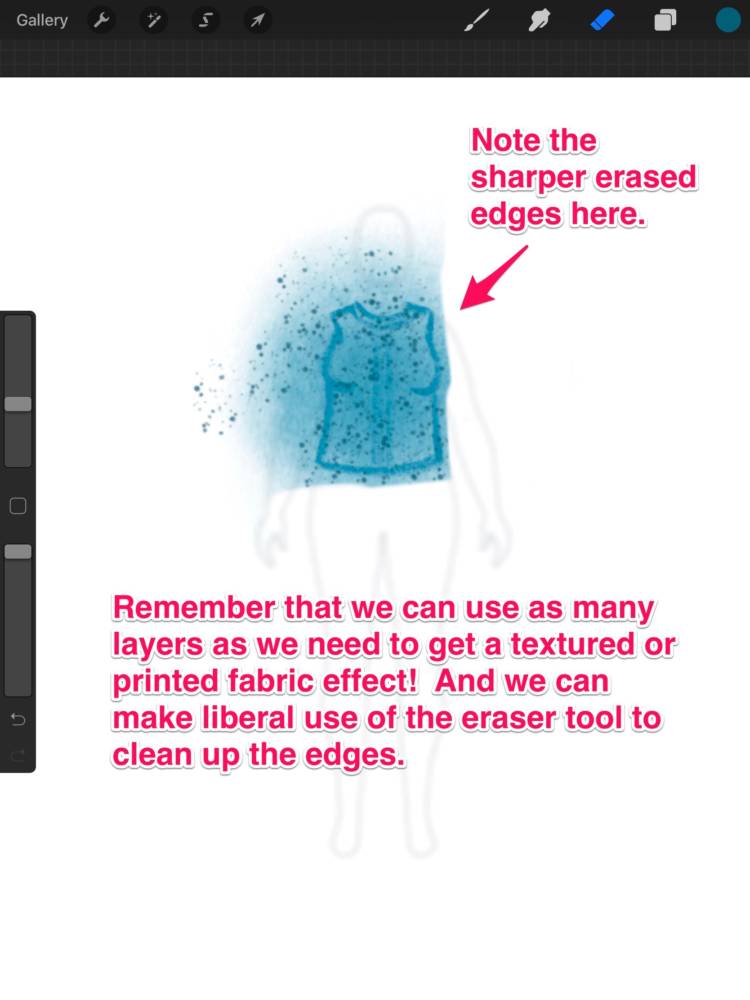
Have fun and explore your options! Don’t forget that you can use the erase tool to clean up edges if you need to use a larger brush size to create an interesting texture or patterned design.
Also don’t be afraid to explore different “techniques.” How does the brush behave when you smoothly spread it vs. tapping it on the screen? Do you like the way colors “bleed” when you use them in the same layer? Or do you want a more bold effect using different layers? This is your fun time to explore. I used dozens of different brushes and tools to create my finished garment designs in order to create different fabric “textures” and “weights.”
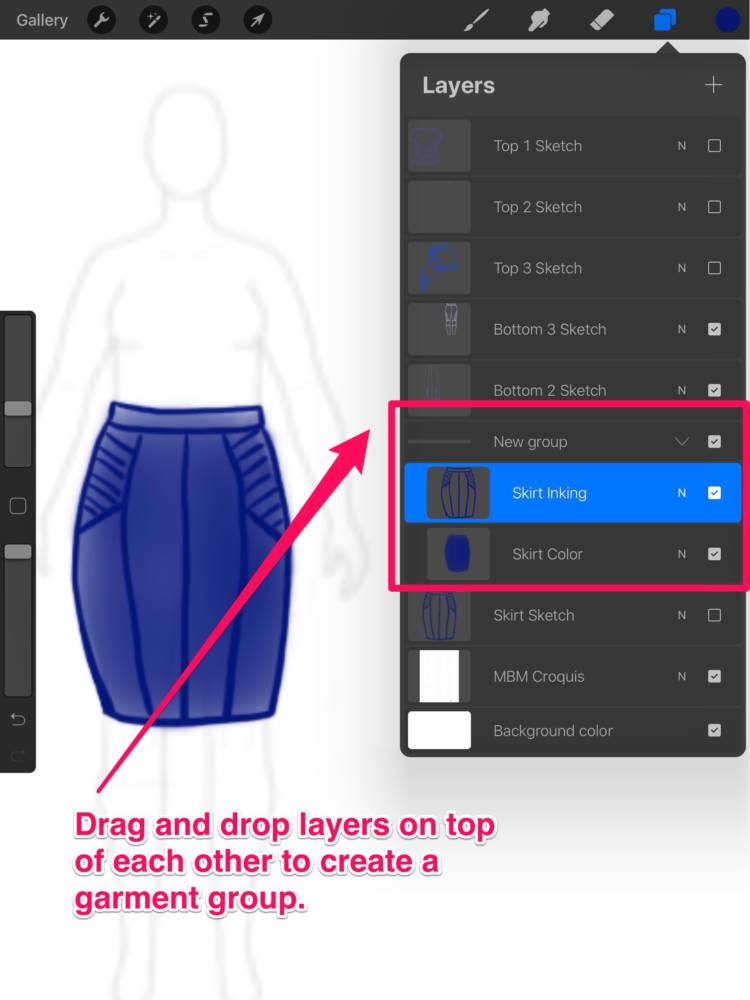
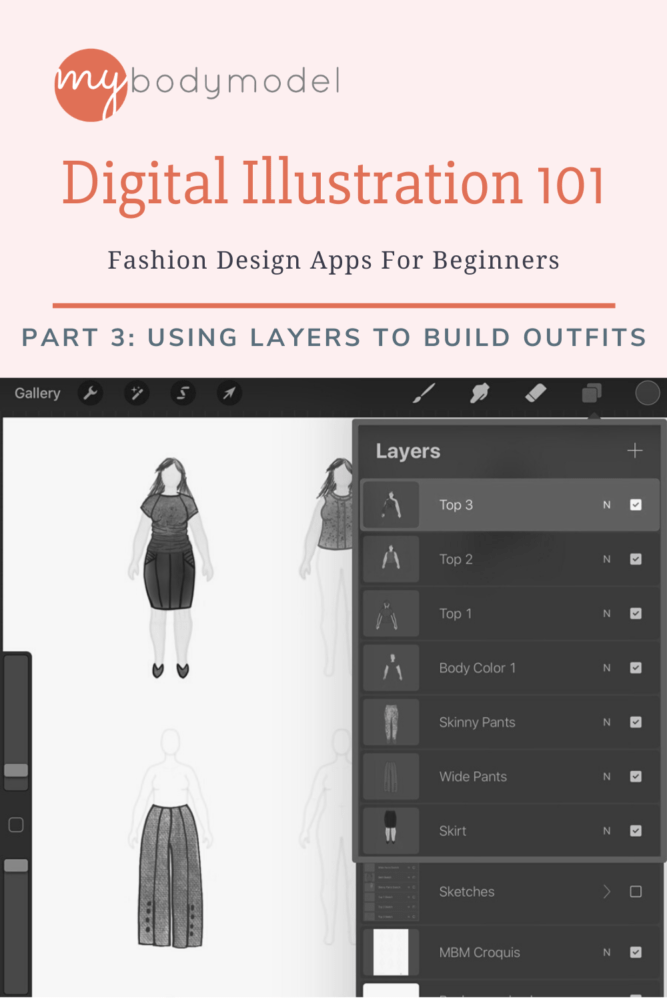
Step 6: Grouping Layers
At this point you probably have a lot of layers. This is ok because we are going to group them to help simplify things! To group two layers, simply select one layer and drag and drop it onto another layer.
In Procreate we have the ability to rename the groups, just as we can rename layers.
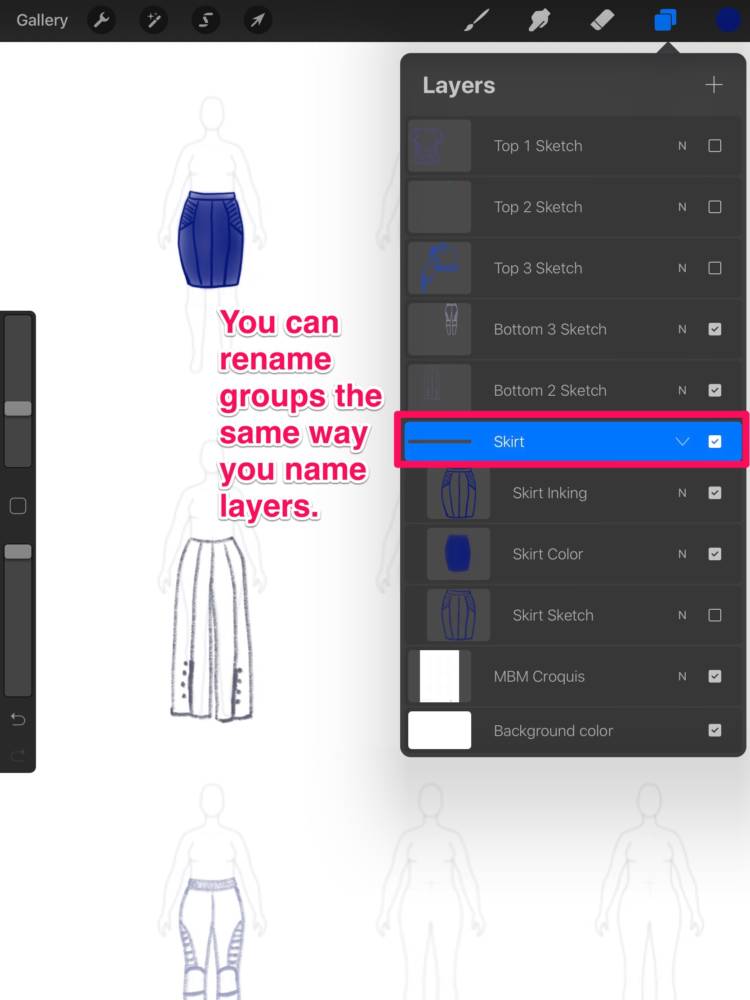
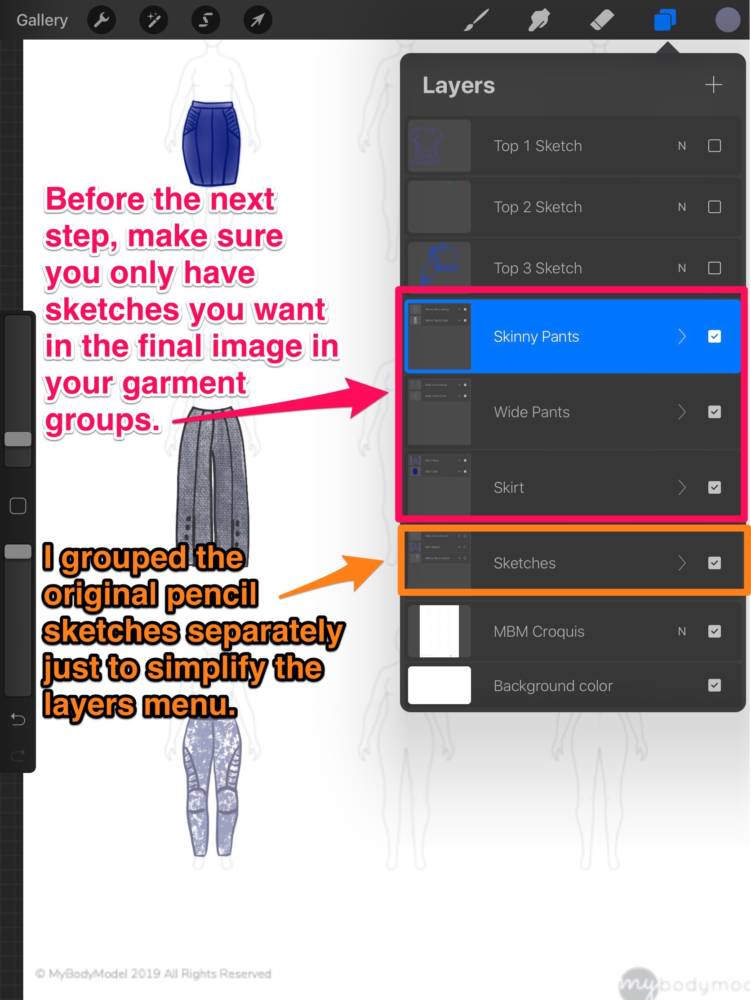
Next, I’m going to repeat this process for each of the 6 garments.
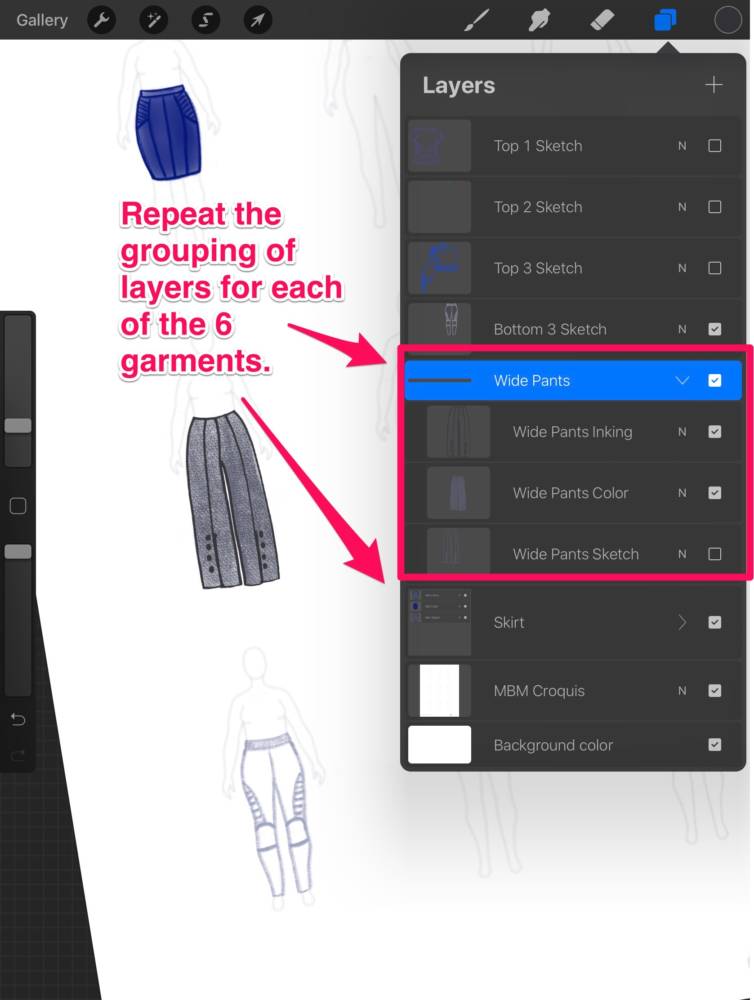
Finally, I’m also going to group together the pencil sketch layers, just to simplify the layers menu even more.
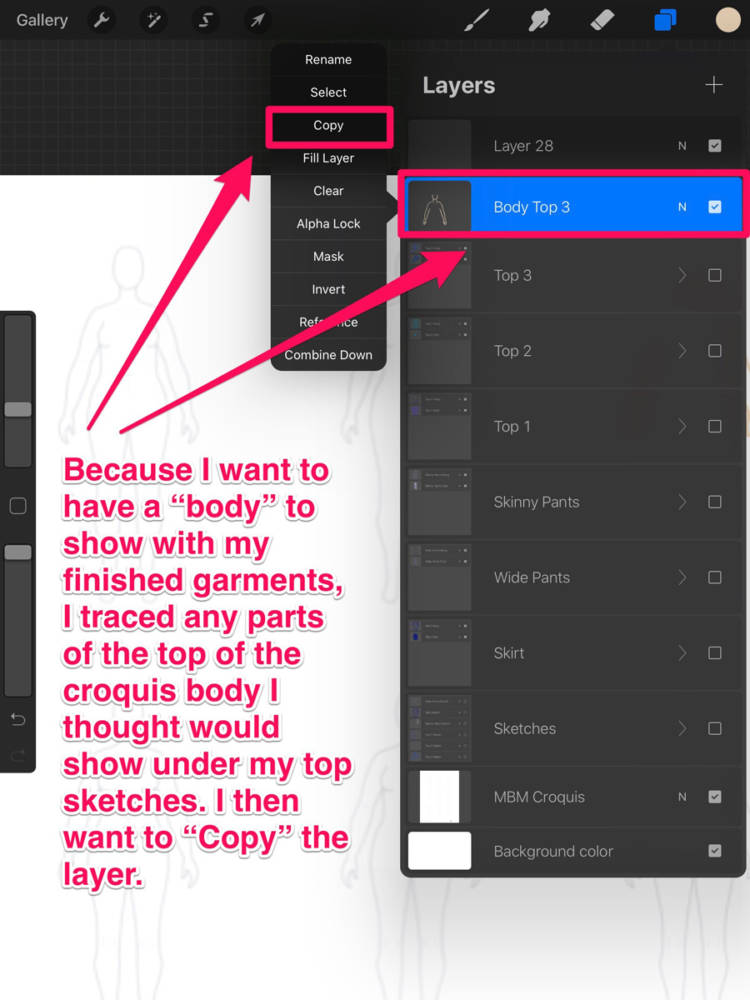
Step 7: Adding the body form and copying layers
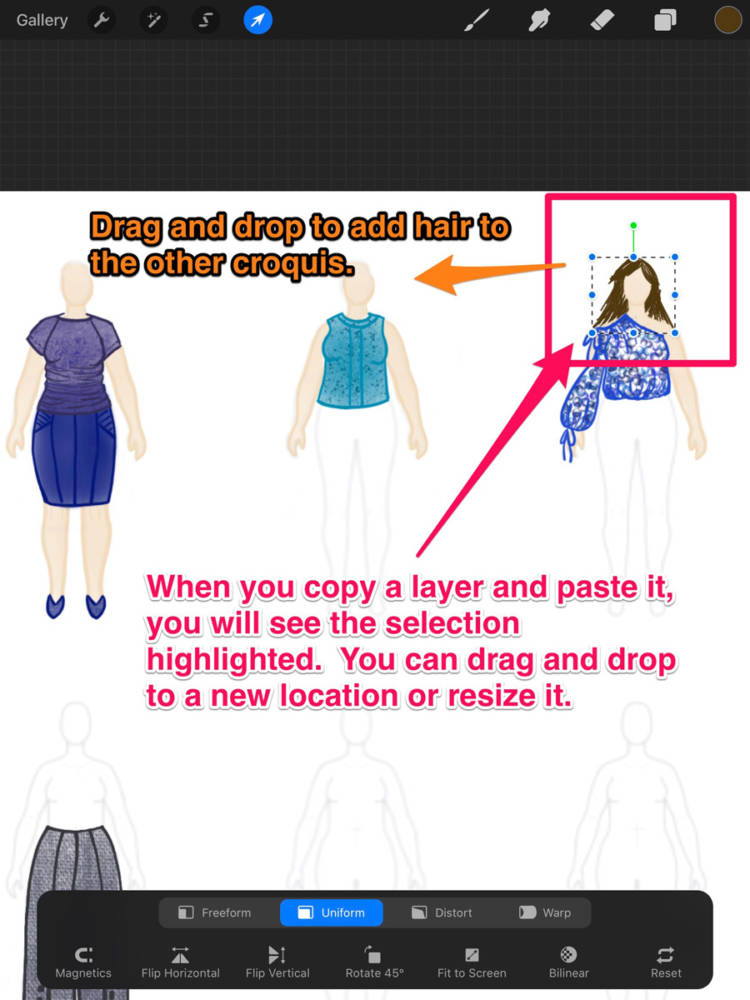
Next, because I want to have a body form on the finished image to show someone wearing the clothes I’ve just sketched, I’m going to trace the MBM croquis. Though I could trace the body from by hand multiple times, I’m instead going to use the “Copy” feature to replicate the body layers.
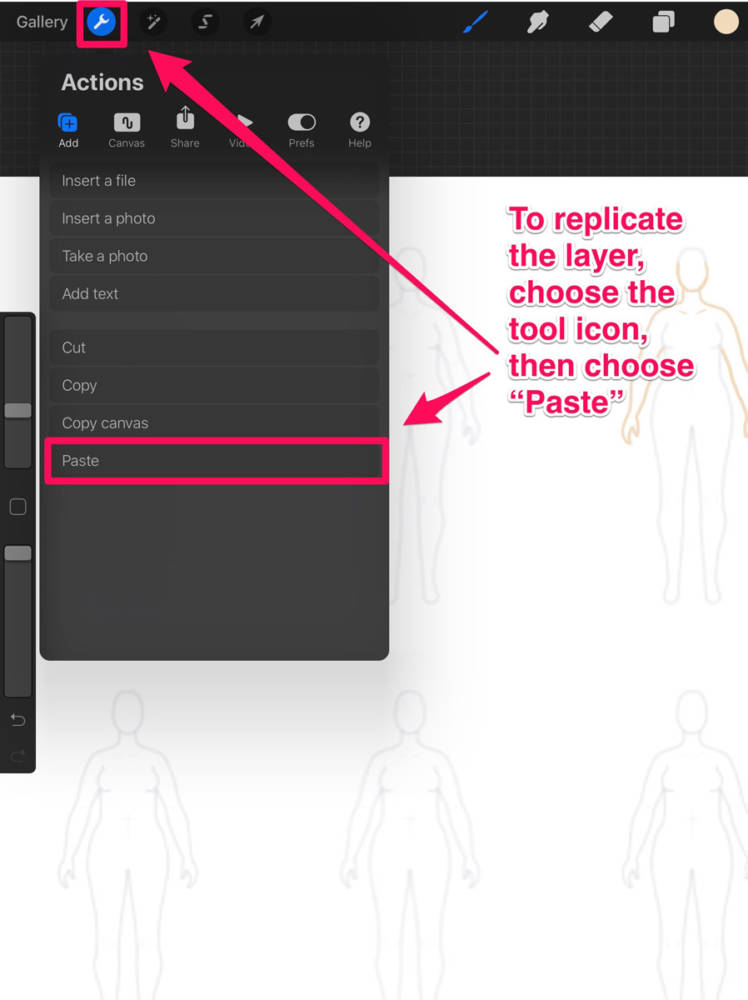
There are multiple ways to replicate layers, and we will look at another technique later. For this technique, to paste the body layer we just copied, we have to choose the “Paste” option from the Tool menu.
I repeat this step for all part of the “top” of the body, including the skin coloring, inking, and hair layers. For each copied layer, I drag and drop to reposition it over a new croquis.
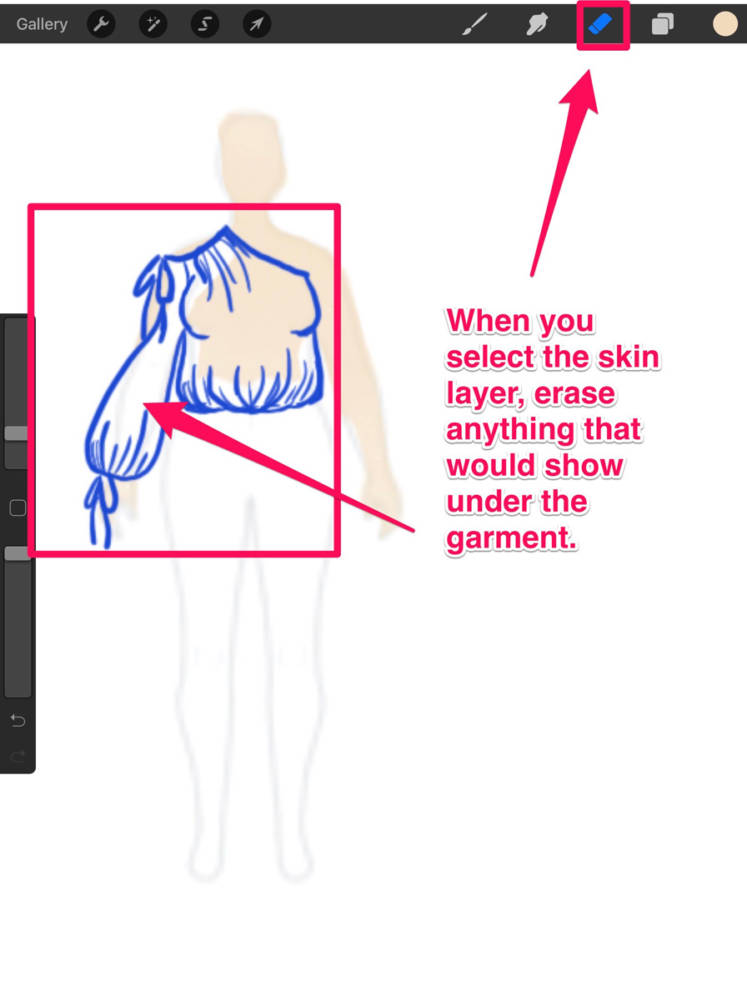
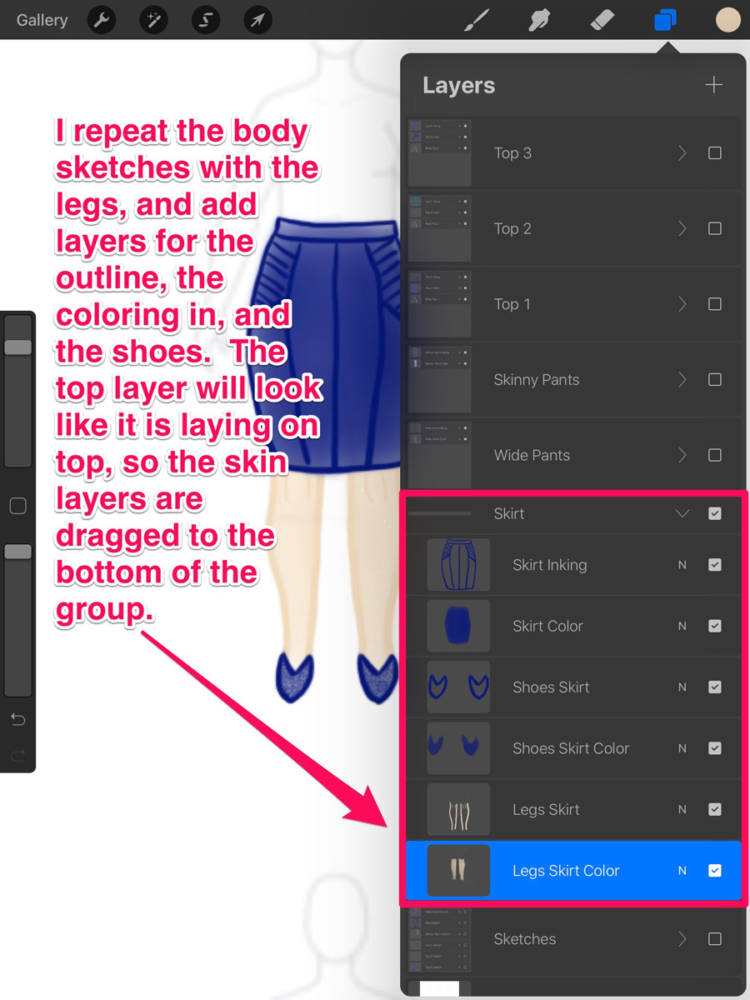
Next we do a bit of reorganization and clean-up work. Make sure to add the body sketches to the appropriate garment grouping, and drag them to the bottom of the list so that the body looks like it is “under” the clothes. Then, by toggling layers on and off, erase anything that you don’t want to show through your final garment sketch.
Finally, the process is repeated for the body body croquis. It isn’t as complicated here because I’m doing 2 trousers, so I only need to add shoes as accessories, and only need to sketch the legs to go with the skirt.
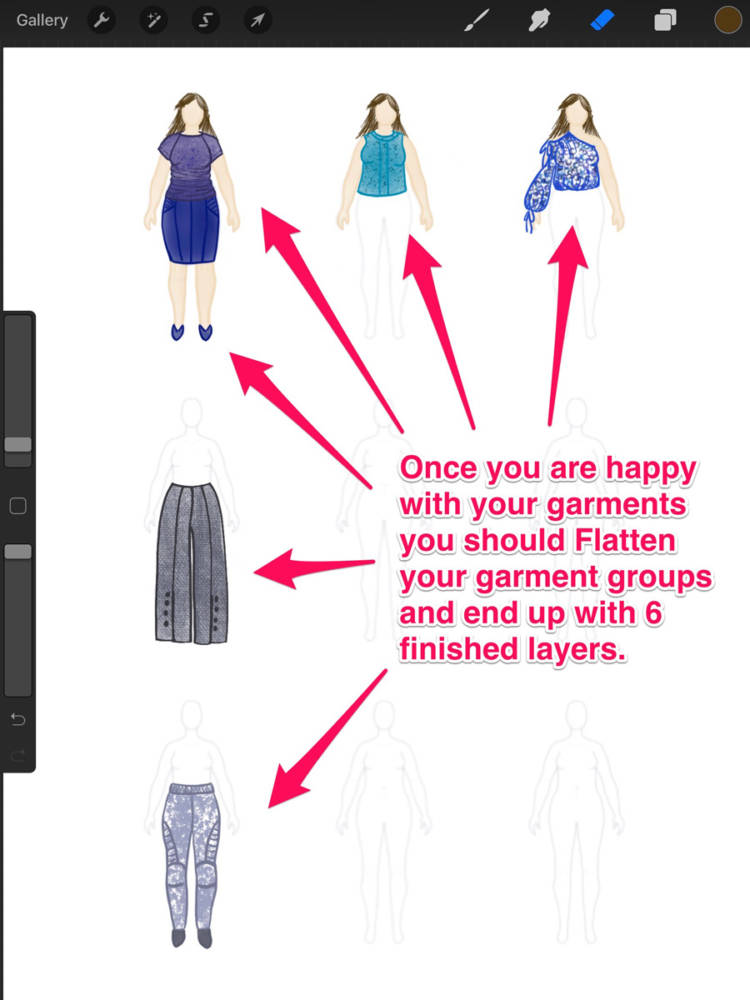
Step 8: Flatten your layers
Right now we have 6 garment groups, with many layers inside each of them. However, to simplify the remaining steps, we want to be able to treat each garment as a single layer moving forward, so we are going to use a technique to combine all of the layers in a single group. Select the group by tapping on it, then choose the menu option to “Flatten.”
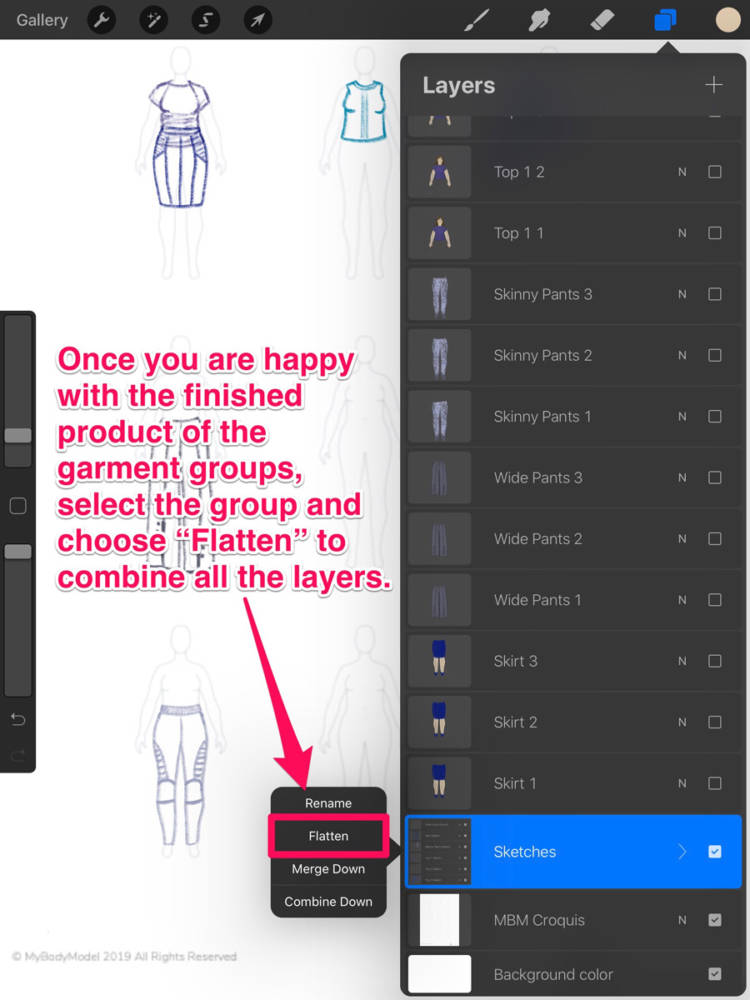
After you Flatten your group, you can have a single layer of each garment.

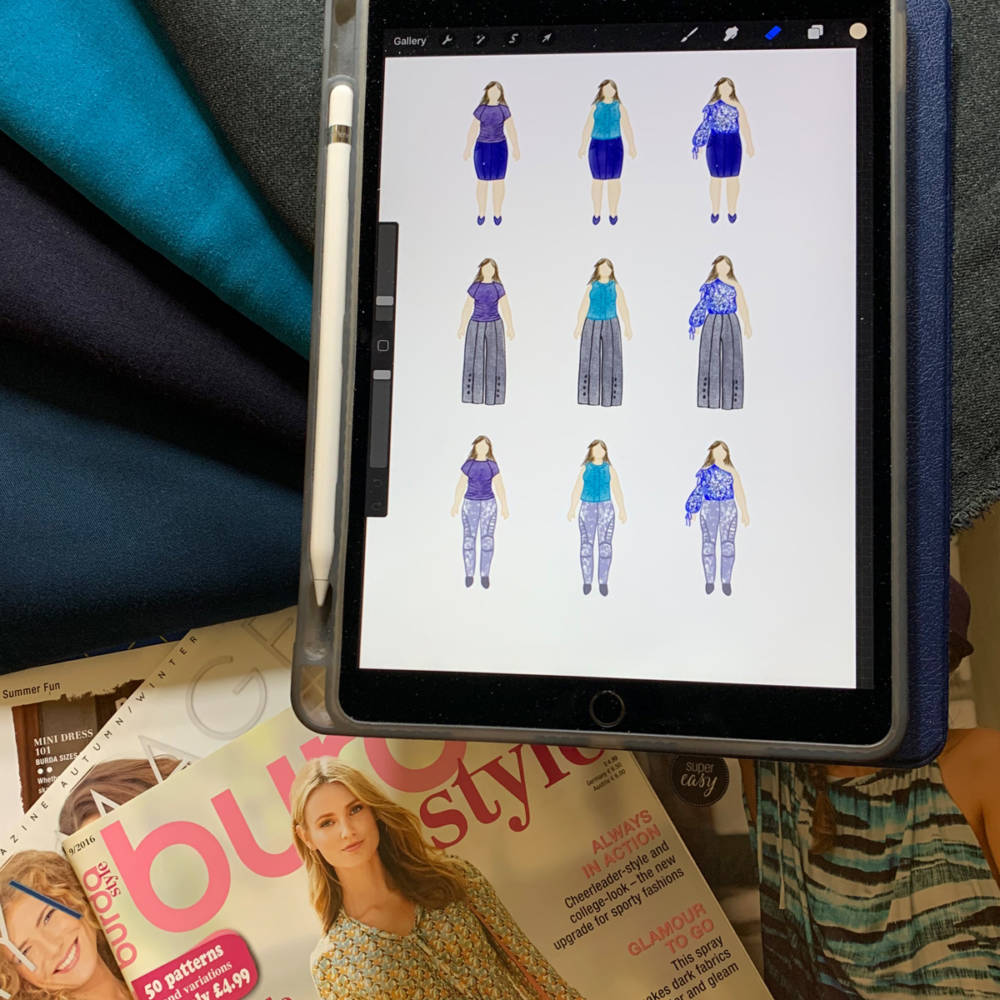
And this is when we can really see the collection sketch coming together!
Step 9: Time to mix-n-match
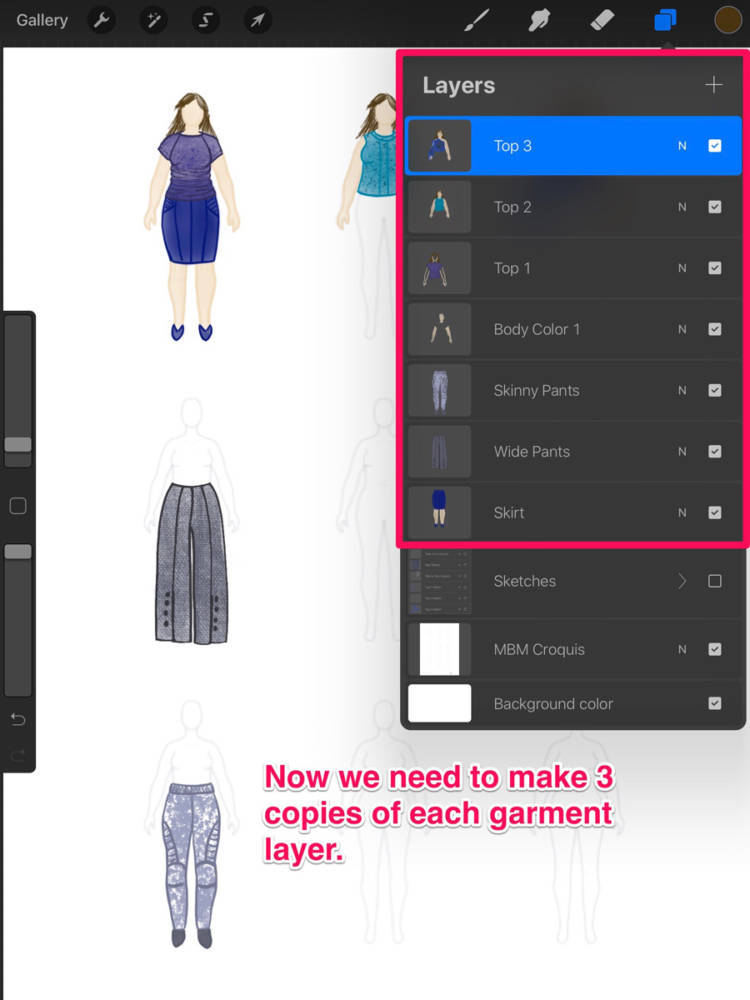
The next step is when the magic of the mix-n-match wardrobe sketch is almost ready to happen! Currently, we have one copy of each garment, but we will need to create 3 copies of each layer to fill out our 3×3 croquis page.
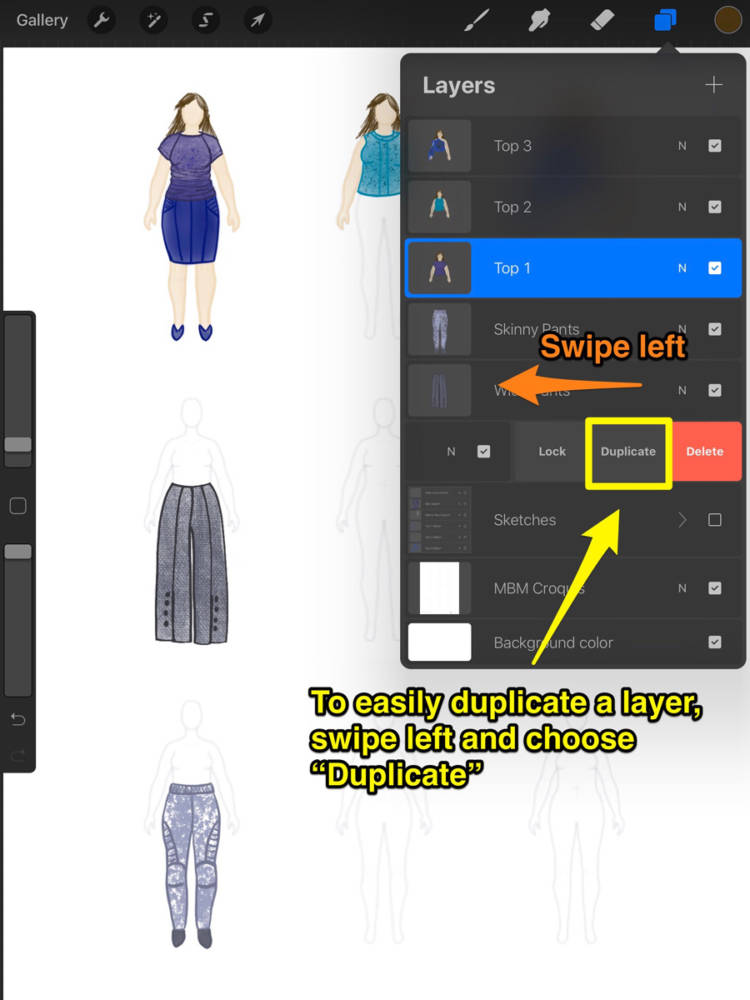
Previously, we used the Copy-Paste technique to replicate layers. This time, we will try a new technique called “Duplicating.” To do this, choose a layer from the layers menu, and swipe left to reveal extra menu items, and choose the one that says “Duplicate.”
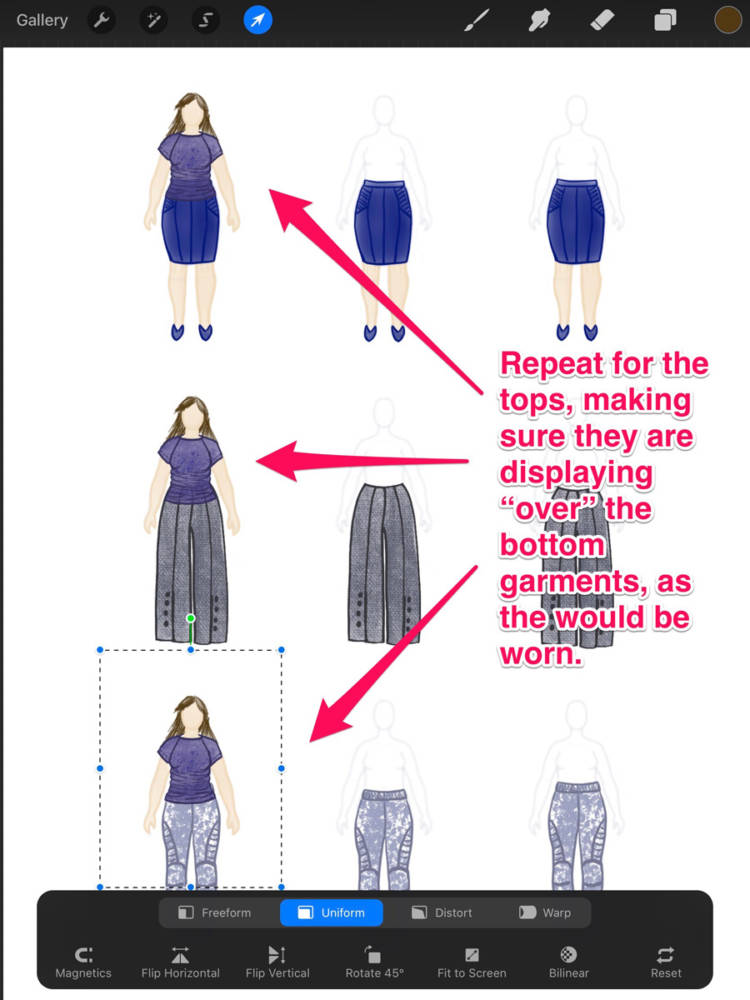
Once we have the duplicate layers, they will appear directly on top of the current layer (you may notice the opacity of your drawing increases when this happens). To move the duplicates, simply select that layer, and drag and drop to the new position, as we had done previously. I am moving copies of the bottoms across the page horizontally, and copies of the tops down the page vertically to create the 3×3 grid.
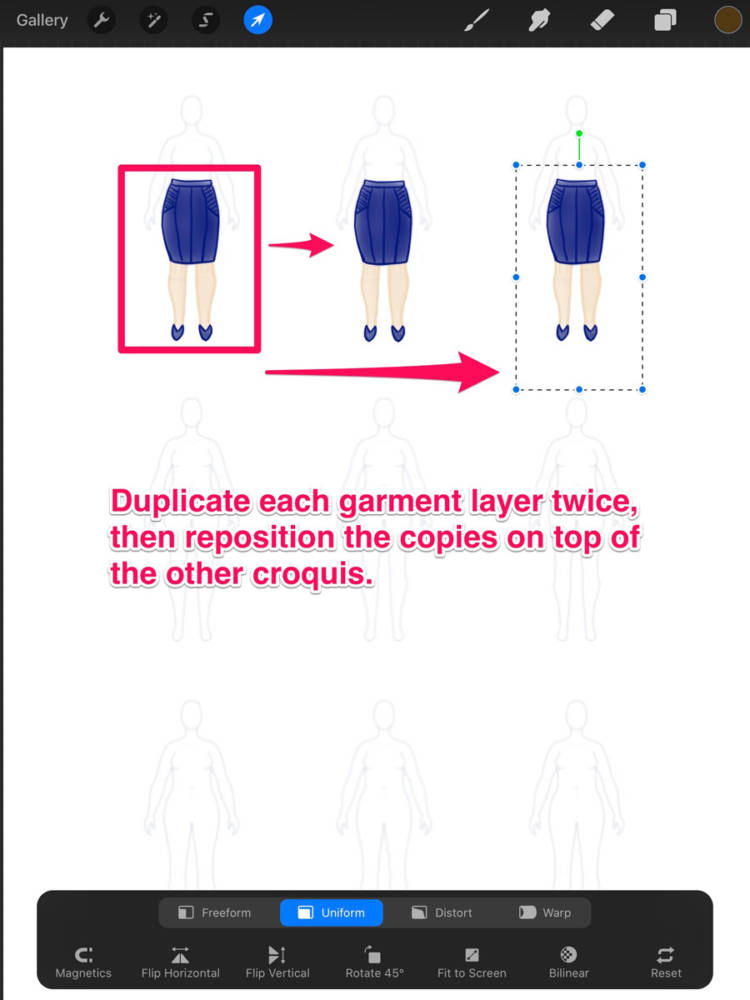
When we use this process on the tops in the collection, we want to make sure to have the top layers positioned above the bottom layers so that it looks like the bottoms are under the tops, as these garments would be worn in real life.
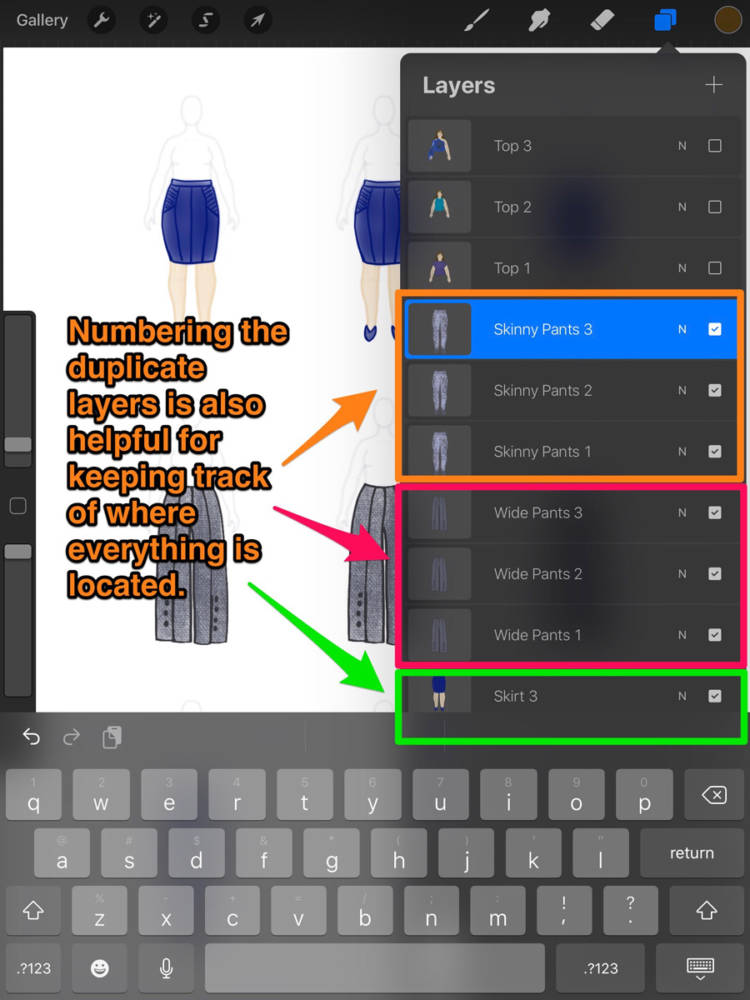
Just to keep track of everything, I like to rename the layers one last time so that I know if the layer is in the first, second, or third position (row or column, depending on the garment). This will be helpful for the next step where we will do one last round of clean up.
Step 10: Finishing Touches
Depending on the opacity of the coloring tools you used, you might see the bottoms showing through the tops in a way that would be unrealistic in real life. We will use the eraser tool one final time to clean up anything that shouldn’t be “showing through” in the final image.
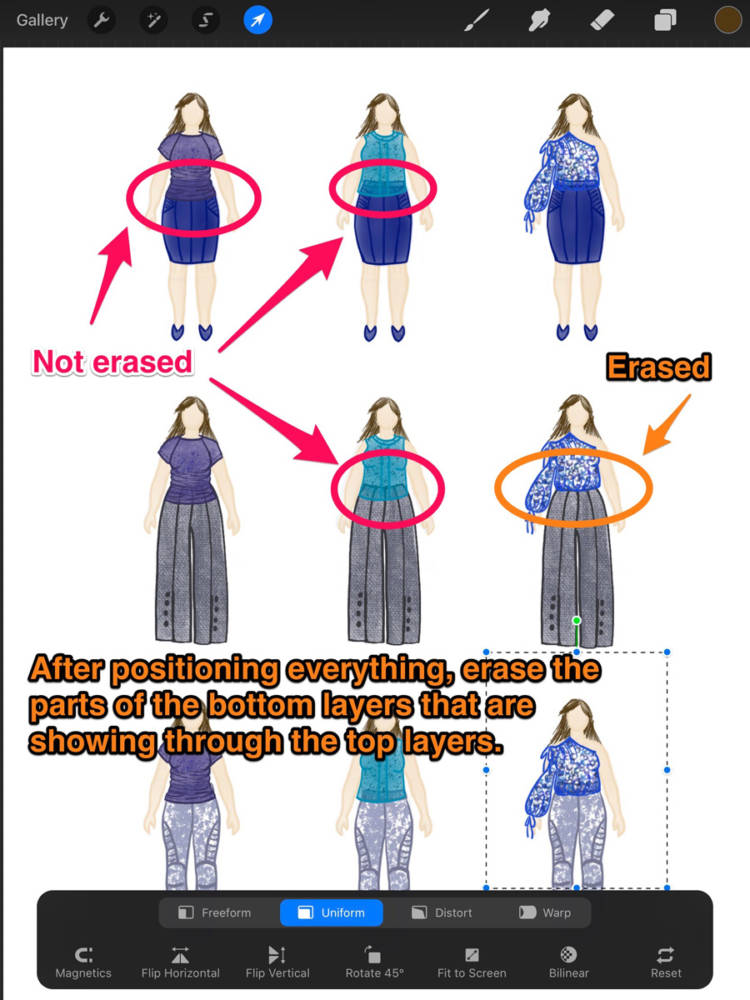
After we do this last bit of clean up we are almost done!
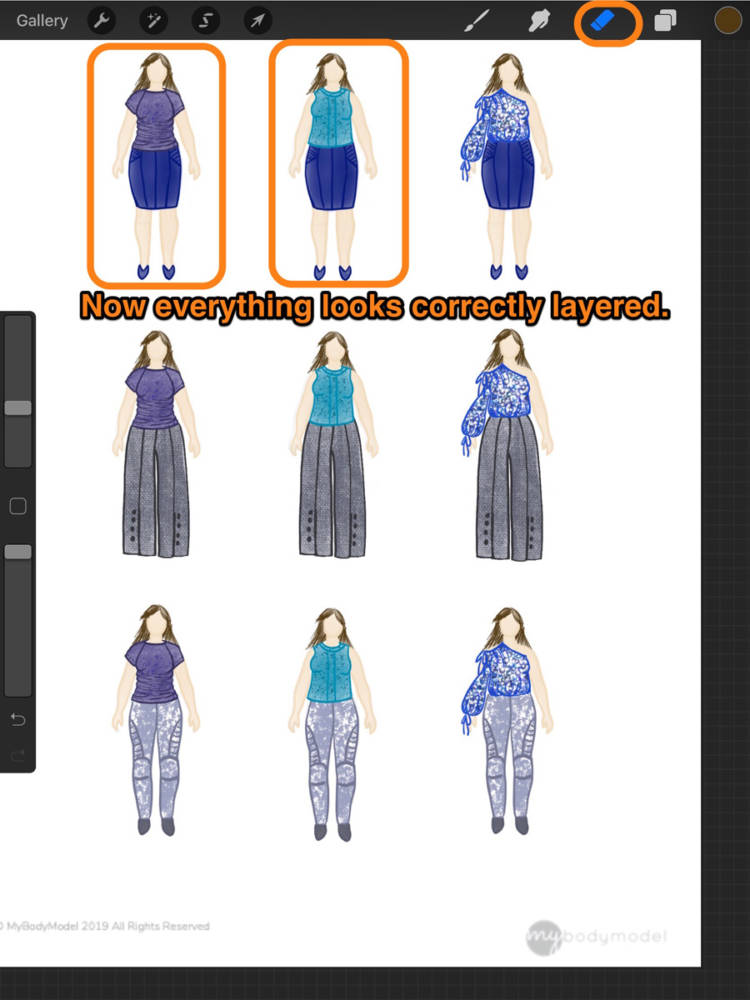
Step 11: Export and share!
Finally, after all that work, we can share our capsule plans! For my final images I like to turn off the My Body Model Croquis so that only the finished image lines show through. The tools setting has a lot of options to Share – pick your favorite file format and export your image to be used later!

And then we are done! Enjoy your final picture, share with tag #mybodymodel on social media, or print and post the inspiration by your sewing machine, on your mood board, or in your sewing journal!
Conclusion
And that concludes our three-part tutorial journey! Hopefully you have learned a few things. We covered how to get started using digital sketching, how different apps can provide similar functionality, and how to use some of the more advanced features to create fun wardrobe plans.
While digital sketching might not ever replace the feel of working with real, tactile drawing and painting tools, you can create similar images with much less time, mess, or expense. Having infinite canvases and tools is a bonus, as is the ease of sharing your final product. Plus, being able to keep everything on a single tablet means that sketching can happen almost anytime, without any elaborate setup for paints, paper, or tools, and all of your work is safely stored within the app.
Being able to pair these sorts of drawing apps with the My Body Model croquis has really allowed me to explore my creative wardrobe building ideas. I hope that with these tutorials you are inspired to digitally sketch out some fun wardrobe plans of your own!
Feeling inspired? Here’s more fashion drawing inspiration and capsule wardrobe ideas.
Did you enjoy this tutorial? Please pin and share!
Please let us know in the comments: Have you tried any new-to-you digital drawing techniques as a result of this tutorial series? What tutorial topics do you want to see next?

Doctor T works in education creating digital classroom spaces, but tries to find the time to put into her hobbies of sewing, blogging, lightspeed saber fencing, and judging competitive roller skating. She started sewing because of a desire to cosplay and make skating costumes, but has become enamored with the idea of sewing her own wardrobe. You can find her on Instagram @doctortdesigns or on her blog.

4 thoughts on “Fashion Design Apps for Beginners 3: Using Layers to Sketch Outfits”
Dear Dr T
Wow! What an amazing set of tutorials you have produced. I can only imagine the amount of time and effort that took and I can’t tell you how appreciated it is. I am a technophobe but your work here has really inspired me to try these techniques – normally I would be drawing on paper. I love My Body Model doodling and sketching but using digital artwork takes it to a different level.
Thank you so very much!
This series answered so many questions I had about using Procreate and some I didn’t know enough to ask! Thank you for inspiring me to get back to sketching my sewing/design plans and thank you for validating the way I use the eraser tool (I had thought that was “cheating”)!
Agree with Marni – Wow! What a great series of articles/visuals you have gifted us with – much appreciated! Thank you, thank you! 😊
Can u do a tutorial on the same for Autodesk Sketchbook, I really don’t know how to use layers over there…🙁✌🏻